 Save
Save My cousin showed up one afternoon with a spoon and a mischievous grin, claiming she'd cracked the code on safe cookie dough. I was skeptical until she handed me a bowl of this tangy, butter-rich mixture flecked with chocolate chips. No eggs, no guilt, just pure scoopable joy. We sat on the kitchen counter passing the bowl back and forth, and I knew instantly I had to learn her trick. That heat-treated flour was the secret all along.
I made this for a birthday party once, scooped into little mason jars with tiny spoons tied on with ribbon. Everyone assumed I'd spent hours on some fancy dessert, but really I'd just whipped it up that morning between coffee and laundry. The best part was watching people take that first bite and pause, trying to figure out why it tasted so much better than the cookie dough they remembered sneaking as kids. The yogurt was my quiet advantage, and I didn't tell a soul until someone finally asked.
Ingredients
- Unsalted butter, softened to room temperature: This is the foundation of that rich, bakery-style flavor, and softening it fully ensures it creams smoothly with the sugar without leaving lumps.
- Plain full-fat Greek yogurt: The tang cuts through the sweetness and keeps the dough creamy and scoopable, plus it adds a hint of protein without changing the texture.
- Granulated sugar: Provides clean sweetness and helps the butter whip up light and fluffy during the creaming stage.
- Light brown sugar, packed: Adds a deeper, molasses-like warmth and a slight chewiness that makes each bite feel more indulgent.
- Pure vanilla extract: A full teaspoon brings out the buttery notes and ties all the flavors together with that familiar cookie smell.
- All-purpose flour, heat-treated: This is the safety step that lets you eat raw dough without worry, and toasting it briefly also mellows any raw flour taste.
- Fine sea salt: Just a pinch enhances the sweetness and keeps the dough from tasting flat or one-dimensional.
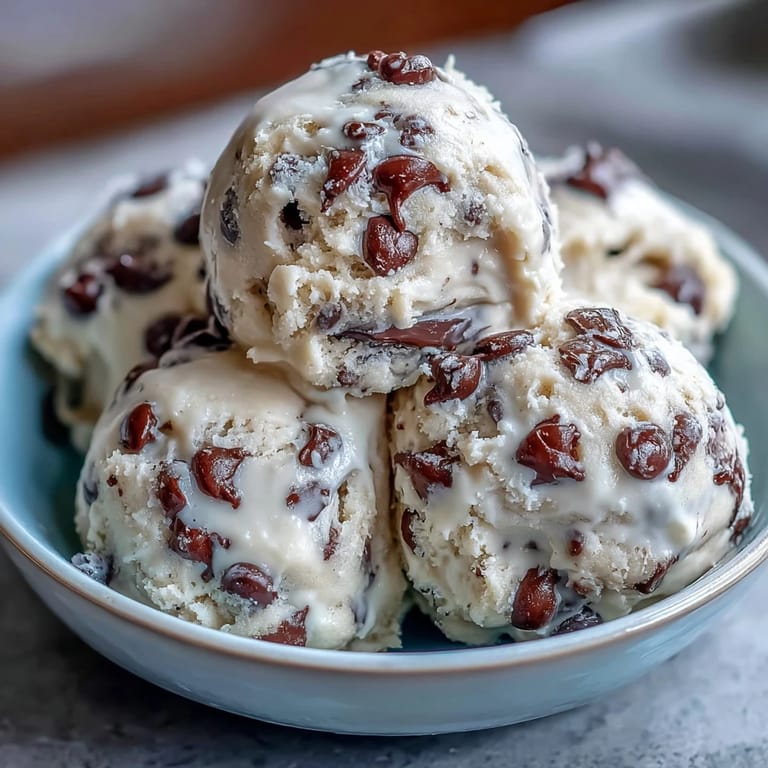
- Mini semisweet chocolate chips: They distribute more evenly than regular chips and give you chocolate in every single spoonful.
Tired of Takeout? 🥡
Get 10 meals you can make faster than delivery arrives. Seriously.
One email. No spam. Unsubscribe anytime.
Instructions
- Heat-treat the flour:
- Preheat your oven to 350°F and spread the flour on a baking sheet in an even layer, then bake for 5 minutes. Let it cool completely on the counter before using it, because warm flour will melt the butter and ruin the texture.
- Cream the butter and sugars:
- Beat the softened butter with both sugars using an electric mixer on medium speed for 2 to 3 minutes, until the mixture looks pale and fluffy. This step traps air and gives the dough a lighter, less dense feel.
- Add the yogurt and vanilla:
- Turn the mixer to low and add the Greek yogurt and vanilla extract, mixing just until smooth and combined. Scrape down the sides of the bowl so nothing gets left behind.
- Incorporate the dry ingredients:
- Whisk the cooled flour and sea salt together in a separate bowl, then gradually add it to the wet mixture on low speed. Mix only until you no longer see dry streaks, because overmixing makes the dough tough.
- Fold in the chocolate chips:
- Use a spatula to gently stir in the mini chocolate chips until they are evenly distributed throughout the dough. Try not to crush them or the dough will streak with chocolate.
- Chill the dough:
- Cover the bowl with plastic wrap or transfer the dough to an airtight container, then refrigerate for at least 30 minutes. This firms up the butter and makes the dough easier to scoop and more satisfying to eat.
- Serve and store:
- Scoop tablespoons of chilled dough and enjoy immediately, or keep it covered in the fridge for up to 5 days. For longer storage, freeze individual portions in a sealed bag for up to a month and thaw in the fridge before digging in.
 Save
Save One night I made a double batch and hid it in the back of the fridge behind the milk, thinking I'd ration it through the week. My roommate found it on day two and left me a note that just said, I know what you did, with a smiley face. We ended up splitting the rest while watching bad reality TV, and it became our Thursday night ritual. Sometimes the best recipes are the ones that turn into traditions without you even trying.
How to Heat-Treat Flour Safely
I used to think heat-treating flour was overkill until I read about how many people get sick from raw flour every year. The oven method is easiest: spread it thin on a baking sheet and bake at 350°F for 5 minutes, stirring halfway if you are nervous about hot spots. If you do not want to turn on the oven, microwave one cup at a time on high for about a minute, stirring every 20 seconds and checking with a thermometer until it hits 165°F. Let it cool completely on the counter before you mix it in, because even slightly warm flour will soften your butter and turn your dough into soup. I keep a jar of pre-treated flour in my pantry now so I can make this on a whim.
Flavor Variations to Try
The base recipe is perfect as written, but once you have made it a few times, it becomes a canvas for whatever you are craving. Swap half the chocolate chips for white chocolate and add a handful of dried cranberries for a sweet-tart twist, or stir in a tablespoon of peanut butter and use peanut butter chips instead of semisweet. I have also folded in crushed pretzels and toffee bits for a salty-sweet version that disappeared in minutes at a potluck. If you want to keep it simple, just add a pinch of cinnamon or a few drops of almond extract to the wet ingredients. The yogurt base is forgiving, so you can experiment without worrying about ruining the texture.
Storage and Make-Ahead Tips
This dough keeps beautifully in the fridge for up to five days, and honestly it tastes even better on day two once the flavors have had time to meld. I like to scoop it into individual portions using a small cookie scoop and store them in a shallow container separated by parchment paper, so I can grab one whenever the craving hits. For longer storage, freeze the scooped portions on a baking sheet until solid, then transfer them to a freezer bag and label it with the date. They will keep for a month, and you can thaw them in the fridge for a few hours or let them sit on the counter for 10 minutes if you are impatient.
- Press plastic wrap directly onto the surface of the dough before sealing the container to prevent it from drying out.
- If the dough gets too firm in the fridge, let it sit at room temperature for 5 minutes before scooping.
- Avoid storing it near strong-smelling foods like onions or garlic, because the dough will absorb those flavors.
 Save
Save Every time I pull this out of the fridge, I feel like I am getting away with something, even though it is completely safe to eat. It is the kind of recipe that makes you feel like a kid again, minus the lecture about salmonella. Keep a batch on hand and thank me later.
Recipe FAQs
- → Is this cookie dough safe to eat raw?
Yes, this dough is completely safe to eat raw. It contains no eggs and uses heat-treated flour that has been baked at 350°F to eliminate any harmful bacteria, making it perfectly safe for immediate consumption.
- → How long does the dough need to chill?
The dough requires a minimum of 30 minutes in the refrigerator to firm up properly. This chilling time is essential for achieving the ideal scoopable texture and allowing flavors to meld together.
- → Can I freeze this dough for later?
Absolutely. Portion the dough into individual tablespoons and freeze in a sealed bag for up to one month. Thaw portions in the refrigerator before eating for the best texture and flavor.
- → What does Greek yogurt add to the dough?
Greek yogurt provides a pleasant tang that balances the buttery sweetness, while also contributing to the creamy texture. It adds moisture and creates a slightly lighter finished product compared to traditional doughs.
- → How do I heat-treat flour without an oven?
Place one cup of flour in a microwave-safe bowl and microwave on high for one minute. Stir thoroughly and check the temperature, continuing in 30-second intervals until it reaches 165°F. Let cool completely before using.
- → Can I make this dairy-free?
Yes, substitute the unsalted butter with vegan butter and replace the Greek yogurt with a non-dairy yogurt alternative. The texture and flavor will remain delicious with these simple swaps.