 Save
Save I discovered hojicha cheesecake on a quiet afternoon browsing a Japanese café's dessert menu, and something about that nutty, roasted tea flavor mixed into creamy cheesecake felt like it was waiting for me to make it at home. The barista mentioned she'd never seen anyone attempt it, which somehow made me want to try even more. What started as curiosity became an obsession with getting that swirl just right, and now it's the dessert I reach for when I want to impress people without making it obvious how much I care.
My friend Sarah arrived on a Saturday evening just as I was pulling this from the oven, and the smell of roasted tea mixed with baking cheesecake stopped her in her tracks. She sat at the counter watching me let it cool, asking about every step, which turned a solo baking project into the kind of moment where you're grateful someone's there to witness it. When we finally cut into it after hours of chilling, the first bite made her close her eyes, and that's when I knew this recipe was keeper.
Ingredients
- Graham cracker crumbs (200 g): The foundation matters more than people think, and crushing them fine rather than chunky gives you that solid, press-into-place base.
- Unsalted butter (90 g, melted): Room temperature butter mixed with the crumbs creates that perfect binding, though melted works faster if you're in a hurry.
- Granulated sugar (2 tbsp for crust, 150 g for filling): Don't skip this step even though it seems minimal, as it adds just enough sweetness to balance the earthy tea.
- Hojicha loose leaf tea or tea bags (2 tbsp or 2 bags): This is where the magic happens, so quality matters here more than anywhere else in the recipe.
- Heavy cream (120 ml total): Use the good stuff if you can, as it carries the hojicha flavor better than the ultra-pasteurized versions.
- Cream cheese (450 g, softened): Leave this out on the counter for at least an hour before you start, lumpy cheese will betray you every time.
- Eggs (2 large): Room temperature eggs blend smoother and create a silkier texture than cold ones straight from the fridge.
- Sour cream (120 ml): This adds tang that makes the hojicha pop, so don't substitute with Greek yogurt or you'll lose that balance.
- Vanilla extract (1 tsp): A small amount keeps the vanilla from competing with the hojicha, letting both flavors shine.
- All-purpose flour (1 tbsp): Just enough to stabilize the filling without making it dense or cake-like.
Tired of Takeout? 🥡
Get 10 meals you can make faster than delivery arrives. Seriously.
One email. No spam. Unsubscribe anytime.
Instructions
- Get your oven and pan ready:
- Preheat to 160°C and line your springform pan with parchment paper on the bottom, which saves you from the heartbreak of a stuck cheesecake. Having everything prepared before you start mixing takes the stress out of the process.
- Build the crust:
- Combine your graham cracker crumbs with melted butter, sugar, and salt in a bowl, then press it firmly across the bottom of the pan with the bottom of a measuring cup. Bake it for 10 minutes just to set it slightly, then let it cool while you work on the hojicha.
- Brew the hojicha cream:
- Heat your heavy cream in a small saucepan until you see just a bit of steam rising, then remove it from heat and add your hojicha tea. Cover it and let it sit for 10 minutes, which is long enough to extract all that roasted flavor without making it bitter.
- Beat the cream cheese smooth:
- In a large bowl, beat your softened cream cheese until it's completely smooth with no lumps visible. This step is worth a full minute of mixing because lumpy filling is a dead giveaway that something went wrong.
- Add sugar and eggs carefully:
- Mix in the sugar until combined, then beat in your eggs one at a time, waiting a moment after each egg before adding the next. This prevents overmixing and keeps the filling light and custardy rather than dense.
- Fold in the finishing touches:
- Strain your cooled hojicha cream into the filling along with your sour cream, vanilla, and flour, then mix just until combined. Overmixing at this point introduces air bubbles that can crack the top, so resist the urge to be thorough.
- Create the swirl:
- Pour the plain batter into your cooled crust, then drop spoonfuls of the hojicha batter randomly across the top. Use a skewer or thin knife to drag through the batters gently, creating those beautiful marbled lines without overdoing it.
- Bake with patience:
- Place your pan on a baking tray and bake for 40 to 45 minutes, until the edges look set but the very center still jiggles slightly when you gently shake the pan. The carryover heat will finish cooking the center as it cools.
- Cool gently in the oven:
- Turn off the oven and crack the door open, then let the cheesecake sit inside for a full hour. This gradual temperature change prevents the dramatic cracks that happen when cheesecake goes from hot to cold too quickly.
- Final chill:
- Remove it from the oven and let it reach room temperature on the counter, then refrigerate for at least 5 hours or overnight. This long chill allows the flavors to deepen and the texture to firm up to that perfect creamy-but-sliceable state.
 Save
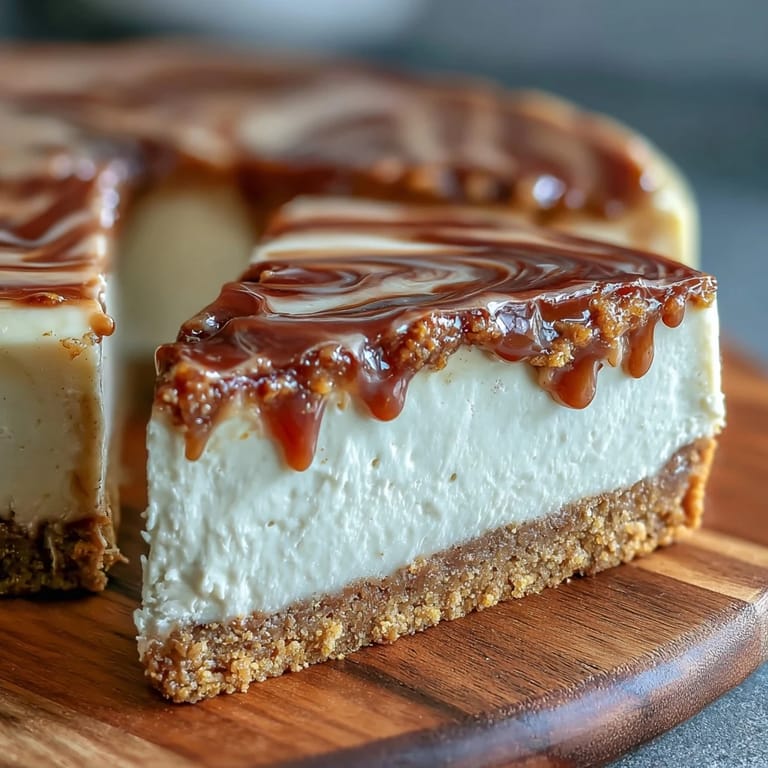
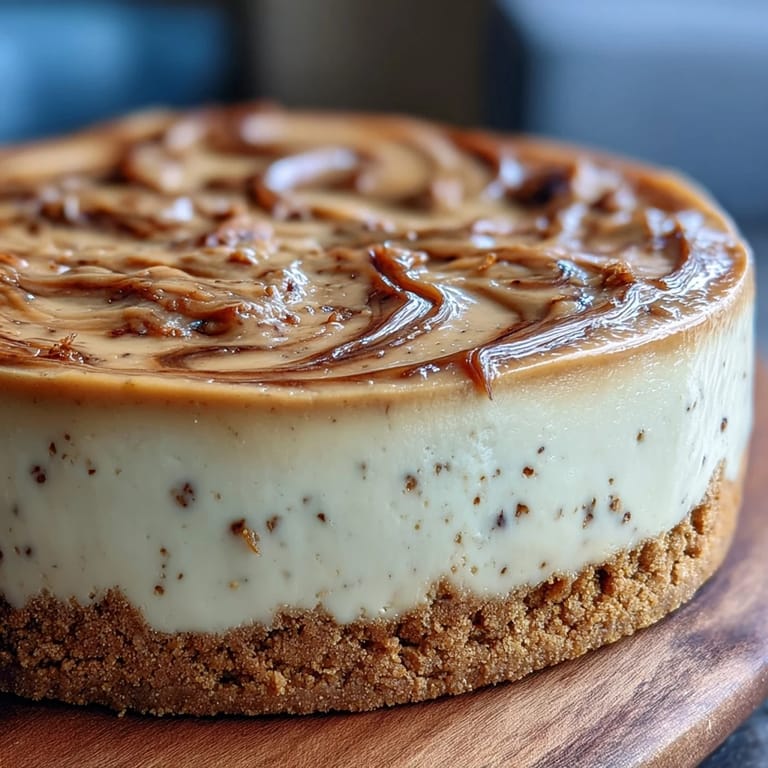
Save There's something almost meditative about watching the hojicha cream swirl into plain batter, knowing that in a few hours it'll set into something beautiful and completely your own. That moment when you pull it from the oven and realize you didn't overbake it, that the center is still soft like it should be, feels like a small kitchen victory worth celebrating.
Why Hojicha Works Here
Hojicha is roasted green tea that tastes more like toasted nuts and coffee than like a typical grassy green tea, which means it doesn't compete with cream cheese but instead complements it. The earthy, warm flavors of roasted tea create depth in a dessert that could otherwise feel one-dimensional, and it's something most of your guests have never encountered in a cheesecake before. Once you taste how the two flavors play together, you'll understand why Japanese dessert makers have been pairing them for years.
The Swirl Technique That Actually Works
Most people overthink the swirl, dragging their knife through the batter like they're creating modern art, but the most beautiful results come from restraint. Drop your hojicha batter spoonfuls in a loose pattern across the top, then make three or four gentle S-curves through it, letting the batters blend naturally without forcing them. You want to see both the plain and hojicha layers in the final result, not chocolate cake swirl chaos.
Serving and Storage Secrets
A sharp knife dipped in hot water between each slice makes the difference between a clean edge and a crumbly disaster, so fill a tall glass with hot water and keep it nearby. Store any leftovers in an airtight container in the fridge for up to four days, and honestly, a cold slice eaten straight from the fridge tastes better than a room temperature one.
- Dust the top with a tiny bit of hojicha powder just before serving to remind people what they're tasting.
- If you want to get fancy, a dollop of unsweetened whipped cream on the side lets people add as much richness as they want.
- Leftover cheesecake slices freeze well for up to a month if you want to make two and save one for later.
 Save
Save This cheesecake sits at that perfect intersection of impressive and approachable, the kind of dessert that makes you seem like you have your life together. Make it once, and you'll find yourself making it again and again, each time noticing something new about how the hojicha flavor deepens the longer it sits.
Recipe FAQs
- → What makes hojicha cheesecake different from regular cheesecake?
The distinctive element is hojicha, a roasted Japanese green tea that imparts earthy, caramel-like notes to the creamy filling. The marbled swirl technique creates visual appeal while concentrating the roasted tea flavor in specific portions, offering a beautiful contrast between the classic cheesecake base and the tea-infused ribbons throughout.
- → Can I use other types of tea for this dessert?
While hojicha provides the traditional flavor profile, you can substitute with matcha for a vibrant green version, Earl Grey for bergamot notes, or chai spices for a warming variation. Adjust steeping times accordingly—stronger teas may require shorter infusion periods to prevent bitterness from overwhelming the delicate cream cheese base.
- → Why does the cheesecake need to cool in the oven with the door cracked?
This gradual cooling technique prevents rapid temperature changes that can cause cracking. By allowing the cheesecake to cool slowly inside the warm oven with slightly reduced heat, the structure settles gently. This step, combined with proper chilling time, ensures that silky smooth texture without unsightly surface fractures.
- → How long should I refrigerate the cheesecake before serving?
Minimum chilling time is five hours, though overnight refrigeration yields the best results. This extended rest period allows flavors to meld and the texture to fully set. The cheesecake becomes easier to slice cleanly and develops that characteristic dense yet creamy consistency that defines quality cheesecake. Plan accordingly when preparing for gatherings.
- → What can I use if I don't have graham crackers?
Digestive biscuits make an excellent substitute, offering similar sweetness and crunch. Other options include vanilla wafers, butter cookies crushed finely, or even shortbread for a richer crust. For gluten-free needs, consider crushed gluten-free cookies or almond flour mixed with melted butter and a touch of sugar to replicate that crumbly texture.
- → Is hojicha powder better than loose leaf tea?
Hojicha powder delivers more intense color and concentrated flavor since it incorporates the entire tea leaf. When using powder, you can skip the steeping and straining steps, mixing it directly into the cream or batter. However, loose leaf tea provides a subtler infusion that many prefer for its nuanced approach. Powder works exceptionally well for garnishing too, creating an attractive dusting atop the finished dessert.