 Save
Save The first time I attempted a geode cake, sunlight streamed through my kitchen window and caught the shimmer of sugar crystals scattered across my counter. There was something whimsical about transforming rock sugar into edible stones, and my curiosity became determination as I experimented with teal coloring and gold accents. I found myself humming graduation tunes while mixing batter, imagining the delight on faces when the slice revealed its sparkling center. The air was perfumed with vanilla and butter, punctuated by laughter as I misjudged the size of the geode wedge—turns out trusting your instincts matters more than precision. This cake became an art project as much as a celebration centerpiece, and I quickly realized it would steal the show at any graduation gathering.
The day I made this cake for my cousin's graduation, my kitchen became a lively workshop. Friends crowded around, helping paint gold edges and sneaking rock sugar to taste. We argued cheerfully over the perfect teal shade and laughed at buttery fingerprints that kept appearing everywhere. Someone accidentally knocked a bowl of colored sugar onto the floor, and after the initial gasp, we just swept it up and decided the next batch was even better. That cake was cut amid applause, and I remember the proud grin as the geode slice sparkled on the serving platter.
Ingredients
- All-purpose flour: Go for unbleached flour for a slightly richer flavor—measure carefully for a tender crumb.
- Baking powder: Double check freshness; it’s the secret to high, fluffy layers.
- Salt: Just half a teaspoon wakes up the other flavors without overpowering the cake.
- Unsalted butter: Bring it to room temperature and beat until creamy for the smoothest batter and buttercream.
- Granulated sugar: Don’t skimp—this makes the cake sweet but also gives structure.
- Large eggs: Room temperature eggs incorporate better, preventing curdling.
- Vanilla extract: Use real vanilla for depth—it's worth it, trust me.
- Whole milk: Makes the cake layers moist and rich; warm it slightly so it blends in easily.
- Powdered sugar: Sift to avoid any lumps for a silky buttercream.
- Heavy cream or milk: Adjust as needed to get a spreadable texture.
- Teal gel food coloring: Start with a little—build up until you hit your perfect shade.
- Rock sugar crystals: Clear or white crystals catch the light beautifully when colored.
- Edible gold leaf or gold luster dust: Use with a soft paintbrush for dramatic, elegant edges.
- Simple syrup: Optional, but makes each slice extra moist and flavorful.
Tired of Takeout? 🥡
Get 10 meals you can make faster than delivery arrives. Seriously.
One email. No spam. Unsubscribe anytime.
Instructions
- Get the Cake Pans Ready:
- Grease and line your three 8-inch pans, feeling the parchment paper fit snug at the bottom before preheating the oven. Having everything organized keeps nerves at bay.
- Mix the Dry Ingredients:
- In a medium bowl, whisk flour, baking powder, and salt until thoroughly combined—breathe in the faint flour scent as you go.
- Cream Butter and Sugar:
- Beat room temperature butter and sugar until light and fluffy—the mixer hums and the mixture turns pale and airy.
- Add Eggs and Vanilla:
- Beat in eggs one at a time, watching the batter become glossy, then stir in vanilla for a gorgeous aroma boost.
- Combine and Bake:
- Alternate adding dry ingredients and milk, starting and finishing with dry; the batter should be smooth and silky. Divide evenly, bake for 28–32 minutes, and check with a toothpick for doneness.
- Cool and Prep Layers:
- Let cakes rest 10 minutes in the pans, then move to racks; cooling completely prevents melting buttercream later.
- Make Buttercream:
- Beat butter until creamy, then add powdered sugar in batches. Pour in vanilla and cream, mix to a dreamy consistency, and tint most of it teal—leave some uncolored for the crumb coat.
- Color Sugar Crystals:
- Mix sugar crystals with drops of teal gel in a bowl, stirring gently until the color is even. Let them air dry if they're damp so they don't clump together.
- Assemble Cake Layers:
- Level cooled cake layers and brush with simple syrup if desired. Stack with buttercream in between, apply a crumb coat, then chill for 20 minutes before frosting with teal buttercream.
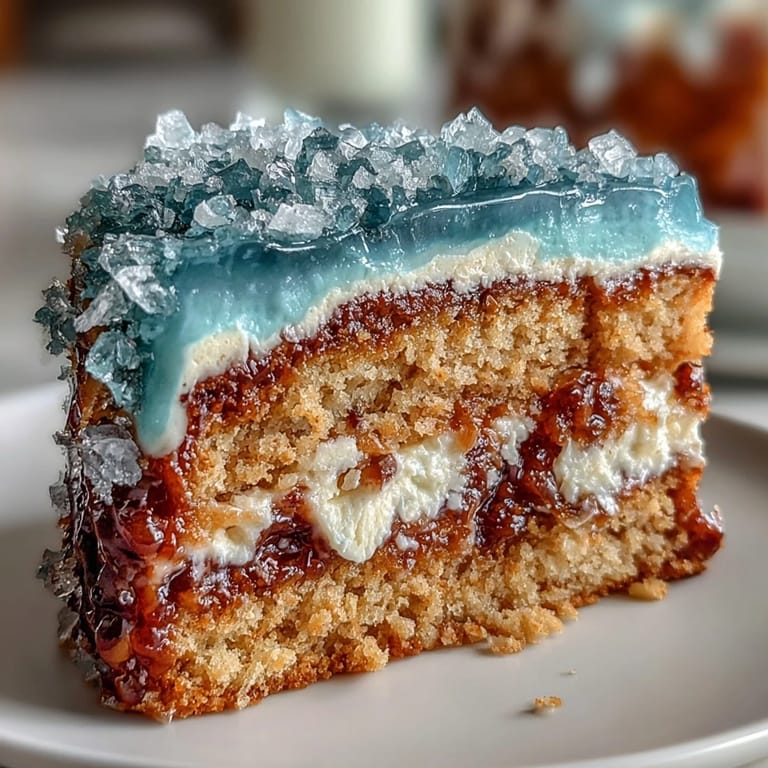
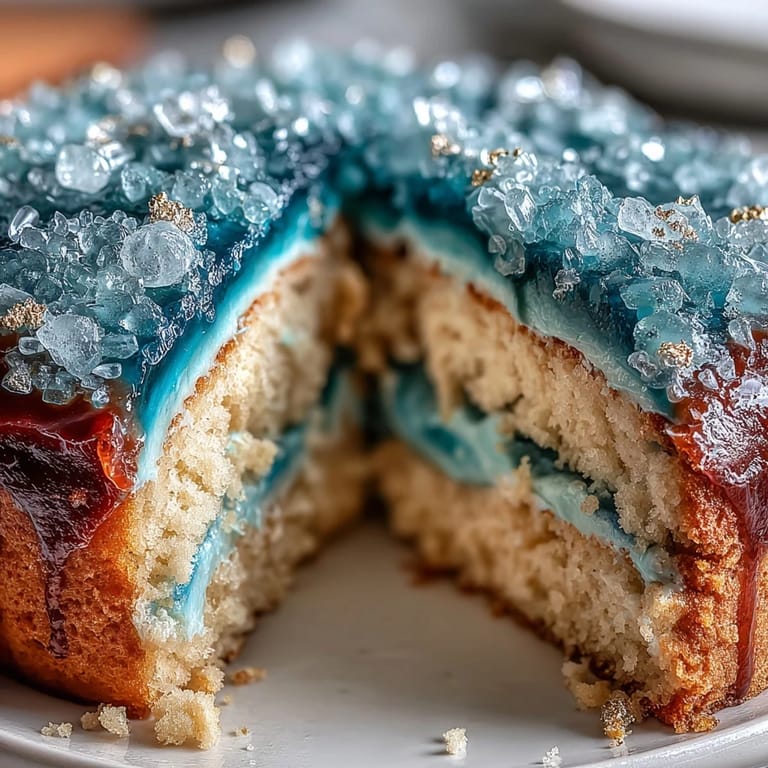
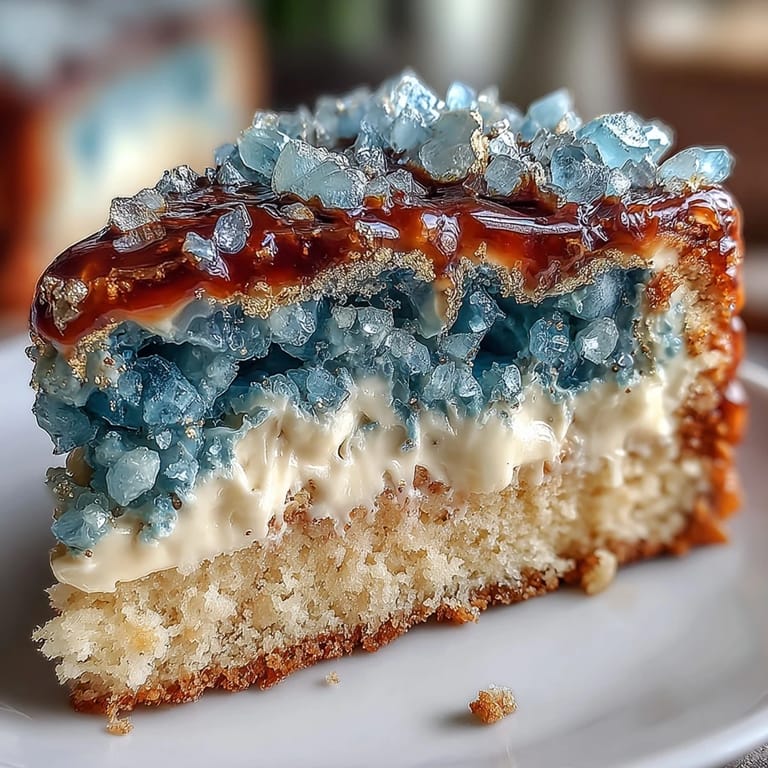
- Carve the Geode Slice:
- Use a sharp knife to cut a wedge from the side, revealing the cake's interior—don't worry, imperfect shapes add character. Coat inside with buttercream, then press colored sugar crystals in, layering from light to dark for depth.
- Paint Gold Edges:
- Using edible gold leaf or gold luster dust with a splash of vodka, delicately paint the geode edges. The effect is dazzling and feels oddly satisfying.
- Add Graduation Touches:
- Finish with extra gold accents and place a graduation topper if you like—it makes the whole cake officially festive.
 Save
Save When my friend’s daughter saw her graduation cake, she squealed and insisted we cut the geode slice first so everyone could admire the sparkly interior. In that moment, the cake felt more like a personal trophy than dessert, and I realized how meaningful homemade celebration treats can be.
Making the Geode Effect Stand Out
Layering the sugar crystals inside the cut-out wedge is where you can get creative. Start with the lightest crystals in the center, then graduate the color deeper toward the edges for a striking, natural geode look. Don’t be afraid to overlap or try different sizes—the most authentic geodes are never perfect. Painting the edges gold gives an instant wow factor, especially under soft lighting.
Buttercream Wisdom for Smooth Finishes
When making the buttercream, patience pays off. Beat the butter longer than you think, and sift the powdered sugar meticulously. If the frosting gets too thick, just add cream a little at a time until it's smooth and easy to spread. Using an offset spatula lets you make those sharp edges and clean lines, and chilling the crumb coat locks everything in place.
Cake Assembly: Mastering a Show-Stopping Slice
Stacking cake layers takes a gentle touch and a steady hand, but a little buttercream between each layer acts as edible glue. Level the cakes first—even a tiny slope changes how the geode slice looks! Do a dry run of your geode cut before making the real wedge so you feel confident and avoid mishaps.
- Prep your tools and workspace before you start for less stress.
- Use a soft paintbrush for gold edges—too stiff and you'll tear the buttercream.
- Remember: perfection isn’t the goal—bold colors and sparkles will always impress.
 Save
Save Cakes like this are conversation starters and memory makers, and you’ll be amazed at all the compliments you get. Enjoy every bite and every moment—celebration cakes never last long!
Recipe FAQs
- → How do I make the geode slice design?
Carve out a wedge from the side of the cake, coat the area with buttercream, and press in teal-colored sugar crystals. Finish with edible gold leaf for accents.
- → Can I customize the color of the geode?
Yes, you can blend teal and blue food coloring or experiment with other shades to match your theme.
- → What flavor variations work well?
Lemon or almond extracts can be added to the vanilla base for extra zest and aroma.
- → How can I achieve smooth buttercream coverage?
Apply a crumb coat, chill for 20 minutes, then finish with tinted buttercream using an offset spatula for a smooth finish.
- → What tools are needed for decoration?
You'll need a serrated cake knife, food-safe paintbrush, electric mixer, mixing bowls, and round cake pans.
- → Is this cake suitable for vegetarians?
Yes, it contains eggs and dairy but no meat products, making it vegetarian-friendly.